Dispute Management
Manage dispute cases through the Qualpay API and portal.
This page provides guidance on managing disputes primarily through our Dispute Management API (Disputes v1.0). This includes information on the operations, workflow, and testing specifications to use when integrating dispute management through Qualpay.
For more information on the disputes process and how to use the portal for disputes, see Disputes in the Qualpay Knowledge Base.
Operations
Qualpay offers the following API operations for use in dispute management:
-
Get Dispute - Send one dispute's control number to get details and response options.
-
Get Disputes - Get details of multiple disputes associated with one vendor or node.
-
Upload a Dispute File - Add a file as supporting documentation for a dispute case.
-
Submit Dispute Response Action - Send a response action either accepting or rebutting a dispute.
-
List Dispute Files - Send a dispute's control number to list all documents uploaded for a dispute response.
-
Remove Dispute Files - Send a dispute's control number and a file key to remove a previously uploaded document.
-
Create Dispute Data - Creates sandbox dispute data to test your integration.
-
Reset Dispute Data - Resets a test or pre-review dispute case to the status
New.
See the Disputes Process and Test the API sections below for more information on the use of these operations.
Prerequisites
Work with your Qualpay representative to ensure compatibility with your integration method with respect to the following:
- Please confirm if you plan to use JSON or an SDK for this integration.
- If you choose an SDK, please specify which one.
Please see the Testing section for integration testing prerequisites.
Disputes Process
This section describes the normal process for managing a dispute using a Qualpay API integration:
1. Get Disputes and Changes in Case Status
Do one of the following to access dispute case information:
- Monitor with webhook - Configure the
dispute_updatewebhook to receive dispute status changes. - Monitor with Get Disputes - Send a Get Disputes request to monitor for dispute status changes, and include
response_options=trueto get available response options for each dispute. - Send Get Dispute request - Send a Get Dispute request with the control number of a dispute and
response_options=trueto receive all available response options for this dispute.
💰 Example
Get Disputes - The merchant sends a Get Disputes request that looks like the following:
curl --request GET \
     --url 'https://api-test.qualpay.com/platform/dispute/browse?count=10&order_on=incoming_date&order_by=desc&page=0' \
     --header 'accept: application/json'
The Get Disputes response includes the control number of a new dispute (in rec_id):
{
  "code": 0,
  "message": "Success",
  "data": [
    {
      "rec_id": 393817200000017,
      "merchant_id": 212000469919,
      "incoming_date": "2025-12-16",
      "amt_tran": 58.94,
      "amt_dispute": 58.94,
      "reason_code": "10.3",
      "reason_desc": "Other Fraud – Card Present Environment",
      "data_type": "C",
      "cbr_workflow": "A",
      "status": "N",
      "date_status_change": "2025-12-16",
      "card_number": "411111xxxxxx1111",
      "card_type": "VS",
      "rec_id_list": "",
      "tran_date": "2025-09-04",
      "cb_ref_num_assoc": 0,
      "reference_number": "24050835204212000000011",
      "cb_ref_num": "100001",
      "purchase_id": "",
      "expiry_date": "",
      "status_label": "New",
      "type_label": "First Time Dispute",
      "workflow_label": "Allocation"
    },
    {
      "rec_id": 393817200000016,
      "merchant_id": 212000469919,
      "incoming_date": "2025-12-16",
      "amt_tran": 58.94,
      "amt_dispute": 58.94,
      "reason_code": "13.1",
      "reason_desc": "Merchandise/Services Not Received",
      "data_type": "C",
      "cbr_workflow": "C",
      "status": "N",
      "date_status_change": "2025-12-16",
      "card_number": "411111xxxxxx1111",
      "card_type": "VS",
      "rec_id_list": "",
      "tran_date": "2025-09-04",
      "cb_ref_num_assoc": 0,
      "reference_number": "24050835204212000000052",
      "cb_ref_num": "100005",
      "purchase_id": "",
      "expiry_date": "",
      "status_label": "New",
      "type_label": "First Time Dispute",
      "workflow_label": "Collaboration"
    }
  ],
  "totalPages": 3,
  "totalRecords": 24
}
Get Dispute - Alerted to the new dispute, the merchant sends a Get Dispute request to get more information about it. This request includes the dispute's control number and response_options=true:
curl --request GET \
     --url 'https://api-test.qualpay.com/platform/dispute/393817200000017?response_options=true' \
     --header 'accept: application/json'
2. Parse GET Response
After you have sent a Get Dispute or Get Disputes request with response_options=true, the GET response provides details on the dispute, possible response actions, and requirements for each available response.
See our Get Dispute API reference for all parameter definitions.
💰 Example
The merchant receives the following Get Dispute response:
{
  "code": 0,
  "message": "Success",
  "data": {
    "rec_id": 393817200000017,
    "merchant_id": 212000469919,
    "incoming_date": "2025-12-16",
    "amt_tran": 58.94,
    "amt_dispute": 58.94,
    "reason_code": "10.3",
    "reason_desc": "Other Fraud – Card Present Environment",
    "data_type": "C",
    "cbr_workflow": "A",
    "status": "N",
    "date_status_change": "2025-12-16",
    "card_number": "411111xxxxxx1111",
    "card_type": "VS",
    "tran_date": "2025-09-04",
    "cb_ref_num_assoc": 0,
    "reference_number": "24050835204212000000011",
    "cb_ref_num": "100001",
    "purchase_id": "",
    "expiry_date": "",
    "status_label": "New",
    "type_label": "First Time Dispute",
    "rec_id_list": [
      ""
    ],
    "workflow_label": "Allocation",
    "response": {
      "label": "Other Fraud - Card Present Environment",
      "type": "reason_code",
      "value": "10.3",
      "actions": [
        "accept",
        "respond"
      ],
      "related_transactions": [],
      "attrs": [
        {
          "label": "Credit Processed",
          "type": "response_code",
          "value": "CP",
          "attrs": [
            {
              "label": "Credit Date",
              "type": "field",
              "value": "credit_date",
              "field_type": "date"
            },
            {
              "label": "Credit Amount",
              "type": "field",
              "value": "credit_amount",
              "field_type": "currency"
            },
            {
              "label": "Reference Number",
              "type": "field",
              "value": "reference_number",
              "field_type": "text"
            },
            {
              "label": "Additional Response",
              "type": "field",
              "value": "message",
              "field_type": "text"
            }
          ],
          "min_docs": "0"
        },
        {
          "label": "Cardholder No Longer Disputes",
          "type": "response_code",
          "value": "ND",
          "attrs": [
            {
              "label": "Additional Response",
              "type": "field",
              "value": "message",
              "field_type": "text"
            }
          ],
          "min_docs": "1"
        },
        {
          "label": "Proof of Manual Imprint",
          "type": "response_code",
          "value": "MI",
          "attrs": [
            {
              "label": "Additional Response",
              "type": "field",
              "value": "message",
              "field_type": "text"
            }
          ],
          "min_docs": "1"
        },
        {
          "label": "Invalid Dispute",
          "type": "response_code",
          "value": "ID",
          "attrs": [
            {
              "label": "Additional Response",
              "type": "field",
              "value": "message",
              "field_type": "text"
            },
            {
              "label": "Not listed above",
              "type": "id_code",
              "value": "IDRC25"
            }
          ],
          "min_docs": "1"
        },
        {
          "label": "Compelling Evidence",
          "type": "response_code",
          "value": "CE",
          "attrs": [
            {
              "label": "Additional Response",
              "type": "field",
              "value": "message",
              "field_type": "text"
            },
            {
              "label": "Evidence that the same card used in the disputed transaction was used in another transaction that was not disputed",
              "type": "ce_code",
              "value": "CE17"
            },
            {
              "label": "Copy of identification presented by the Cardholder along with either receipt, contract or invoice",
              "type": "ce_code",
              "value": "CE18"
            }
          ],
          "min_docs": "1"
        }
      ]
    }
  }
}
This provides him with the following information:
- Dispute details - Important details about the dispute, including the dispute reason code (
10.3) and description (Other Fraud...), the dispute type (C), and its workflow (A). - Reference number - In the
dataobject, thereference_numberis a 23-digit number generated by the product initiating the transaction. The reference number is created by the acquirer and is the number used to identify the orignal transaction that is being disputed. It is also available on the Transaction Detail Settled Tab in the Qualpay Manager. Use the reference number any time you need to communicate about a related transaction. - Available actions - In the
responseobject, theactionsarray shows that the merchant can accept the dispute or respond with a rebuttal. He chooses to respond. - Available responses - In the
responseobject, theattrsarray shows the available responses and their associated requirements. The merchant chooses to send aCredit Processed(CP) response reason code. - Required fields - The
"Credit Processed"object shows that the following fields are required in his Submit Dispute Response Action request:credit_date,credit_amount,reference_number, andmessage. - Required documents - The
"Credit Processed"object also shows that the merchant is not required to upload a document. (The value ofmin_docsis0.)
NOTE: Dispute Currency
Disputes always appear in the home currency of the BIN and ICA. As a result, the dispute currency may not always match the currency of the original transaction. You can use foreign currency processing to authorize the transaction in the target currency and receive funds in the home currency of the BIN and ICA.
3. Upload Document
Depending on your response, send an Upload a Dispute File request with the dispute control number and a file. Please note:
- Conditional requirement - This step is required if your chosen response reason code shows
min_docs=1in your GET response. Otherwise, it is optional. - One file - You may upload only one file per dispute response.
- Upload first - You must upload documentation before responding.
Due to restrictions from card brands, the file must meet the following requirements:
- One PDF no greater than 10 MB in size and no more than 19 pages in length.
- For retrieval requests: One PDF no greater than 2 MB in size and no more than 4 pages in length.
- If you have multiple documents to submit, combine them into a single PDF file.
- Do not password-protect or otherwise lock the PDF file.
A success response confirms the document has been successfully uploaded and associated with the dispute case. If you receive an error during upload, verify that the file meets all the requirements above.
You can send a List Dispute Files request to list the documents that have been uploaded for the dispute case. Send a Remove Dispute File request to remove a document that was uploaded for the dispute case.
💰 Example
Upload a Dispute File - Although not required to, the merchant chooses to upload a file to support his response. He sends an Upload a Dispute File request that looks like the following:
curl --request POST \
     --url https://api-test.qualpay.com/platform/dispute/393817200000017/doc/upload \
     --header 'accept: application/json' \
     --header 'content-type: multipart/form-data' \
     --form 'label=Supporting documentation.' \
     --form file='@test-PDF.pdf'
He receives the following success response:
{
  "code": 0,
  "message": "Success"
}
List Dispute Files - To double-check, he sends the following List Dispute Files request:
curl --request GET \
     --url https://api-test.qualpay.com/platform/dispute/393817200000017/doc/list \
     --header 'accept: application/json'
He receives the following List Dispute Files response:
{
  "code": 0,
  "message": "Success",
  "data": {
    "docs": [
      {
        "contentType": "application/pdf",
        "lastModified": 1766433727000,
        "key": "ENV-sbox/dispute/rebuttal/393817200000017/212000469919-393817200000017.pdf",
        "size": 4223,
        "label": "Supporting documentation.",
        "user": -1,
        "user_login": "",
        "user_name": "System"
      }
    ]
  }
}
Remove Dispute File - The merchant then decides not to send the file with his response, so he sends the following Remove Dispute File request (using the value of key from the List Dispute Files response):
curl --request POST \
     --url https://api-test.qualpay.com/platform/dispute/393817200000017/doc/delete \
     --header 'accept: application/json' \
     --header 'content-type: application/json' \
     --data '
{
  "key": "ENV-sbox/dispute/rebuttal/393817200000017/212000469919-393817200000017.pdf"
}
'
He receives a Remove Dispute File success response:
{
  "code": 0,
  "message": "Success"
}
4. Respond
After uploading any documentation you wish to include, send a Submit Dispute Response Action request. This request should include:
action- The action you are taking. (Ensure this was listed as an available action in your GET response.)response_code- If you choose to respond, the response reason code you have selected. (The response reason code isvaluein your GET response and sent asresponse_codein a Submit request.)amt_dispute- The amount being disputed.- Other required fields - Include the required fields returned in the GET response for your response reason code. See the 'Response Type' section in Dispute Conventions for more information.
A success response confirms the dispute response action has been submitted. See the section 'Dispute Workflows' in Dispute Conventions for how this dispute case proceeds after submission.
💰 Example
Submit Dispute Response Action - The merchant sends the following Submit Dispute Response Action request:
curl --request POST \
     --url https://api-test.qualpay.com/platform/dispute/393817200000017/action \
     --header 'accept: application/json' \
     --header 'content-type: application/json' \
     --data '
{
"action": "respond",
"response_code": "CP",
"amt_dispute": 58.94,
"credit_date": "2025-09-10",
"credit_amount": "58.94",
"reference_number": "24050835204212000000011",
"message": "Credit processed per customer request."
}
'
He receives the following response:
{
"code": 0,
"message": "Success",
"data": {}
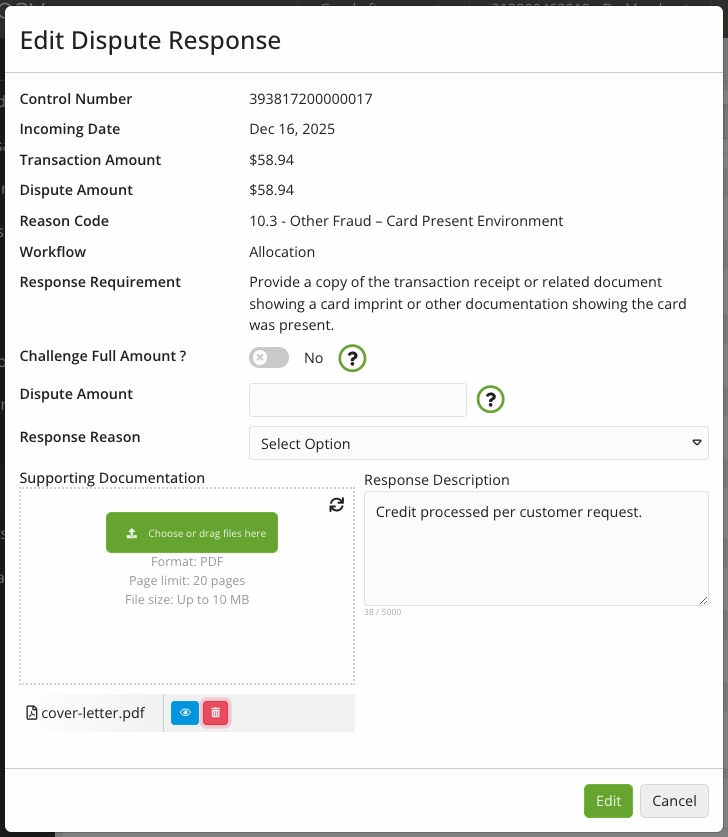
}5. Review and Edit Response
Access your Qualpay merchant sandbox to check your response. Select 'Disputes,' then 'In Progress Rebuttals,' and select your dispute case to view its details.
If you need to edit your response, select 'Edit,' change the field values, and submit.
💰 Example
The merchant checks his dispute case in his sandbox, and he sees a list of his actions. He selects 'Edit' and sees the following:
Testing
This section walks you through the process of setting up and using your Qualpay sandbox to test disputes:
1. Create a Sandbox Account
To create a sandbox account, do the following:
- Follow the steps in the Create a Sandbox Account guide for the type of account you'd like (partner or merchant).
- Follow the steps in Get Your API Credentials to save your vendor ID and/or merchant ID and your API key.
2. Seed Test Data
Once you have completed the steps above, contact your Qualpay account representative and provide the following:
- the email address associated with your sandbox account
- the merchant ID associated with your sandbox account
Qualpay will then seed test data accordingly.
3. Test the Portal
Using the merchant portal
The process for testing the Qualpay merchant portal disputes UI is the same whether you've signed up as a partner (which generates and boards a merchant account to your partner sandbox) or as a merchant (which generates an independent merchant sandbox):
Merchant portal test instructions
-
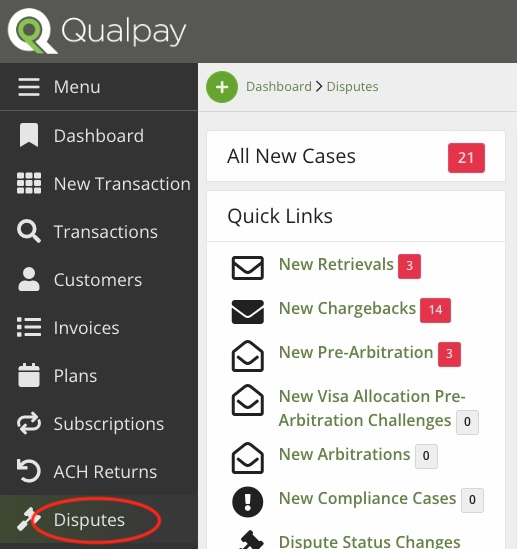
Log in to your Qualpay merchant sandbox portal and select 'Disputes' in the left-hand menu. There, you will see notifications of the new test disputes that Qualpay has seeded:
-
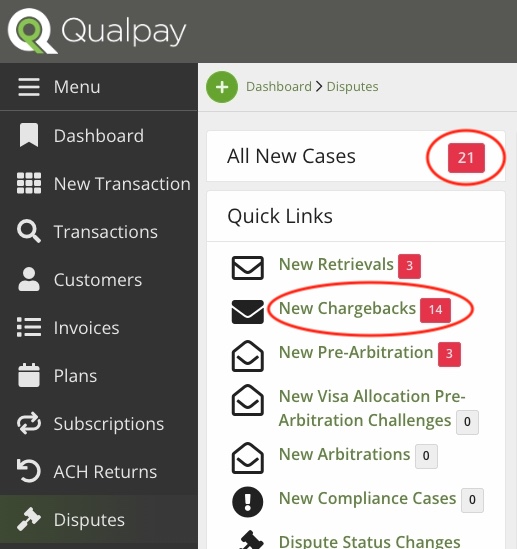
To view a list of the dispute cases, select the notification next to 'All New Cases' or select a specific dispute type or status:
-
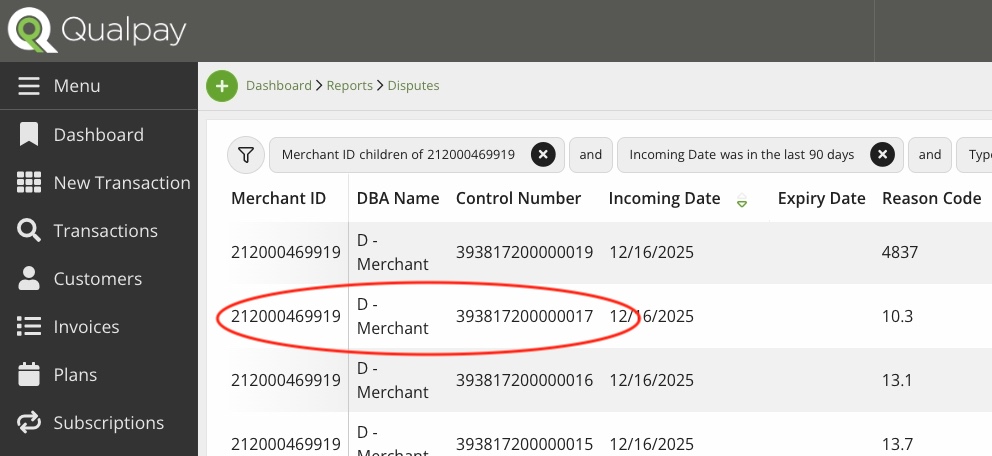
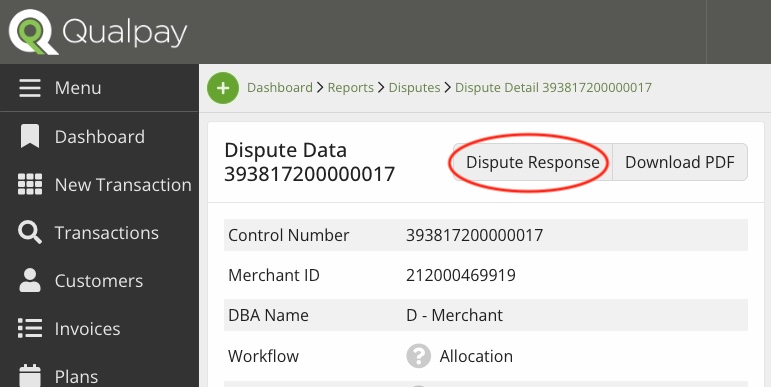
In the list, click on the row of the dispute case you want to test:
-
This opens the dispute detail page for the selected dispute. Here, you can view the dispute's data, response requirements, and any related cases. Select 'Dispute Response' to access the response interface:
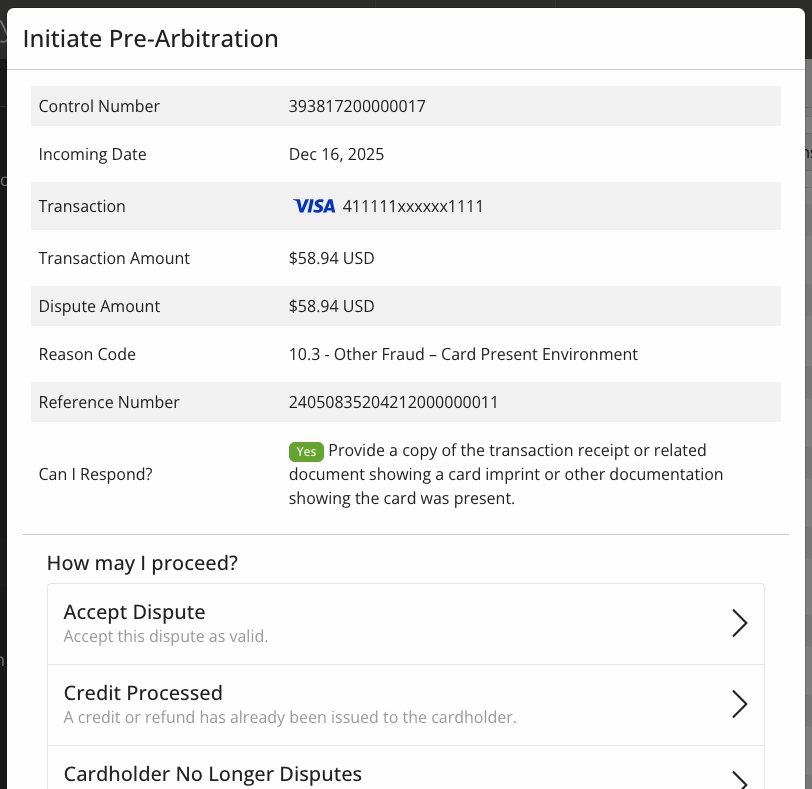
-
In the response interface, select the action you wish to test, and follow the prompts:
-
After submitting the response, you can return to the dispute detail page for that dispute case to view and edit your response:

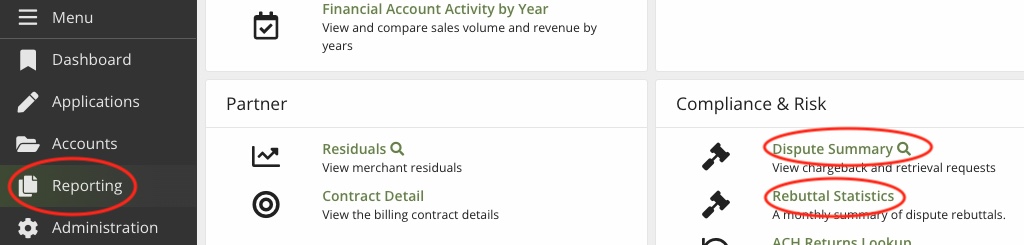
Using the partner portal
In the partner sandbox, you can view your merchants' chargeback and retrieval requests and a summary of dispute rebuttals. To do so, log in to your partner portal and select 'Reporting.' Under 'Compliance & Risk,' select 'Dispute Summary,' 'Dispute Lookup' (the magnifying glass), or 'Rebuttal Statistics':
4. Test the API
You can test Qualpay's Disputes API workflow using our 'Try It!' feature or your own system:
- To use this site's 'Try It!' feature, see our Using the 'Try It!' Feature guide to send requests.
- To use your own system, follow our Authentication guide to base 64 encode your credentials and send requests.
Once you're set up to send test API requests using the system of your choice, do the following:
- Create test dispute - Although Qualpay will have seeded your sandbox with dispute test data, you can also send an API request to generate your own. Follow the Create Dispute Data guide to generate a test dispute with the dispute type of your choosing.
- Test disputes process - Follow the Disputes Process section above to get information on the test dispute, upload a test document, and send a test response.
- Reset test dispute - To reset your test dispute case to
Newfor further testing, send a Reset Dispute Data request.